專案架構
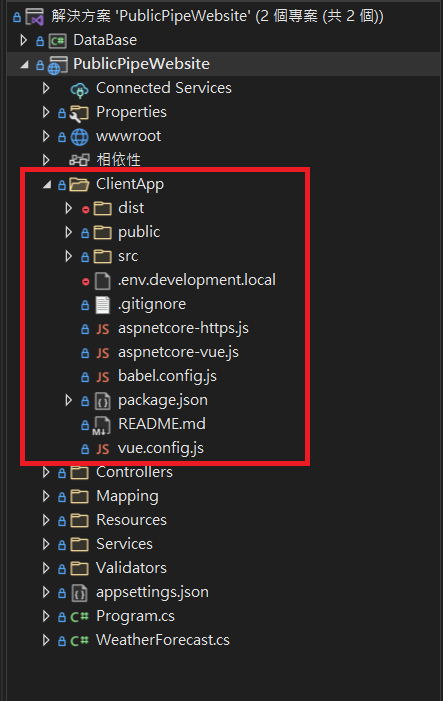
目前 dotnet core webAPI 專案與 Vue 專案的整合有兩種做法,第一種為將前端專案放置於dotnet專案中,前端專案的資料夾名稱取名為ClientApp,如下圖所示
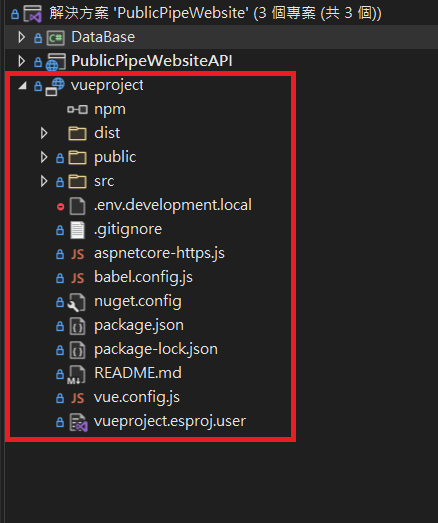
另一種專案架構為將dotnet專案、前端專案各自分開,如下圖
專案開發方式
以上專案架構可配合以下兩種專案開發方式
前後端專案分開建置: 透過Visual studio 2022 設定分開建置dotnet專案與前端專案,當專案在進行Debug(F5)時,IDE會各自建置dotnet專案與前端專案,前端專案會獨立開啟一個Chrome瀏覽器,且無法設定為由既有瀏覽器開啟。
設定的方式參考微軟官方教學
教學課程:使用 Vue 在 Visual Studio 中建立 ASP.NET Core 應用程式
-
透過微軟 Microsoft.AspNetCore.SpaProxy 套件:
SpaProxy替我們做以下幾件事:
- 執行前端專案建置指令
npm run serve - 當前端dev server啟動後將網址轉至前端頁面
安裝與設定SpaProxy步驟如下:
-
安裝套件
dotnet add package Microsoft.AspNetCore.SpaProxy --version 6.0.5 -
設定csproj
<PropertyGroup> //設定前端專案目錄位置 <SpaRoot>..\VueProject\</SpaRoot> //設定當前端dev server啟動後將網址轉至前端專案網址 <SpaProxyServerUrl>https://localhost:5002</SpaProxyServerUrl> //設定執行前端專案指令 <SpaProxyLaunchCommand>npm run serve</SpaProxyLaunchCommand> <DefaultItemExcludes>$(DefaultItemExcludes);$(SpaRoot)node_modules\** </DefaultItemExcludes> </PropertyGroup> -
設定dotnet專案 launchSettings.json
{
  "$schema": "https://json.schemastore.org/launchsettings.json",
  "iisSettings": {
    "windowsAuthentication": false,
    "anonymousAuthentication": true,
    "iisExpress": {
      "applicationUrl": "http://localhost:35452",
      "sslPort": 44352
    }
  },
  "profiles": {
    "PublicPipeWebsiteAPI": {
      "commandName": "Project",
      "launchBrowser": true,
       //設定dotnet webapi位置
      "launchUrl": "https://localhost:5001",
      "environmentVariables": {
        "ASPNETCORE_ENVIRONMENT": "Development",
        //設定 HOSTINGSTARTUPASSEMBLIES 為 SpaProxy
        "ASPNETCORE_HOSTINGSTARTUPASSEMBLIES": "Microsoft.AspNetCore.SpaProxy"
      },
      "applicationUrl": "https://localhost:5001;http://localhost:5003",
      "dotnetRunMessages": true
    },
    "IIS Express": {
      "commandName": "IISExpress",
      "launchUrl": "swagger",
      "environmentVariables": {
        "ASPNETCORE_ENVIRONMENT": "Development",
        "ASPNETCORE_HOSTINGSTARTUPASSEMBLIES": "Microsoft.AspNetCore.SpaProxy"
      }
    }
  }
}
以上前端專案設定為 https://localhost:5002 而dotnet專案設定為 https://localhost:5001,所以當我們在進行Debug(F5)時IDE會先啟動dotnet專案然後再啟動前端專案,並等待前端專案啟動後將瀏覽器位置轉址至 https://localhost:5002 。
- 執行前端專案建置指令
設定開發環境中前端專案呼叫API時對應至後端專案網址
因為前端專案設定為 https://localhost:5002 而dotnet專案設定為 https://localhost:5001,所以必須透過設定proxy代理將前端專案呼叫API時能對應至後端專案網址,這部分設定於 vue.config.js 下的 devServer.proxy
const fs = require('fs')
const path = require('path')

const baseFolder =
    process.env.APPDATA !== undefined && process.env.APPDATA !== ''
        ? `${process.env.APPDATA}/ASP.NET/https`
        : `${process.env.HOME}/.aspnet/https`;

const certificateArg = process.argv.map(arg => arg.match(/--name=(?<value>.+)/i)).filter(Boolean)[0];
const certificateName = certificateArg ? certificateArg.groups.value : "VueProject";

if (!certificateName) {
    console.error('Invalid certificate name. Run this script in the context of an npm/yarn script or pass --name=<<app>> explicitly.')
    process.exit(-1);
}

const certFilePath = path.join(baseFolder, `${certificateName}.pem`);
const keyFilePath = path.join(baseFolder, `${certificateName}.key`);

module.exports = {
    devServer: {
        public: 'localhost',
        https: {
            key: fs.readFileSync(keyFilePath),
            cert: fs.readFileSync(certFilePath),
        },
        proxy: {
          	//設定所有網址轉至localhost:5001
            '^/': {
                target: 'https://localhost:5001/'
            }
        },
        port: 5002
    }
}
專案Release流程
-
於dotnet csproj專案檔案中新增DebugEnsureNodeEnv與PublishRunWebpack
	<Target Name="DebugEnsureNodeEnv" BeforeTargets="Build" Condition=" '$(Configuration)' == 'Debug' And !Exists('$(SpaRoot)node_modules') ">
		<!-- Ensure Node.js is installed -->
		<Exec Command="node --version" ContinueOnError="true">
			<Output TaskParameter="ExitCode" PropertyName="ErrorCode" />
		</Exec>
		<Error Condition="'$(ErrorCode)' != '0'" Text="Node.js is required to build and run this project. To continue, please install Node.js from https://nodejs.org/, and then restart your command prompt or IDE." />
		<Message Importance="high" Text="Restoring dependencies using 'npm'. This may take several minutes..." />
		<Exec WorkingDirectory="$(SpaRoot)" Command="npm install" />
	</Target>

	<Target Name="PublishRunWebpack" AfterTargets="ComputeFilesToPublish">
		<!-- As part of publishing, ensure the JS resources are freshly built in production mode -->
		<Exec WorkingDirectory="$(SpaRoot)" Command="npm install" />
		<Exec WorkingDirectory="$(SpaRoot)" Command="npm run build" />

		<!-- Include the newly-built files in the publish output -->
		<ItemGroup>
			<DistFiles Include="$(SpaRoot)dist\**" />
			<ResolvedFileToPublish Include="@(DistFiles->'%(FullPath)')" Exclude="@(ResolvedFileToPublish)">
				<RelativePath>wwwroot\%(RecursiveDir)%(FileName)%(Extension)</RelativePath>
				<CopyToPublishDirectory>PreserveNewest</CopyToPublishDirectory>
				<ExcludeFromSingleFile>true</ExcludeFromSingleFile>
			</ResolvedFileToPublish>
		</ItemGroup>
	</Target>
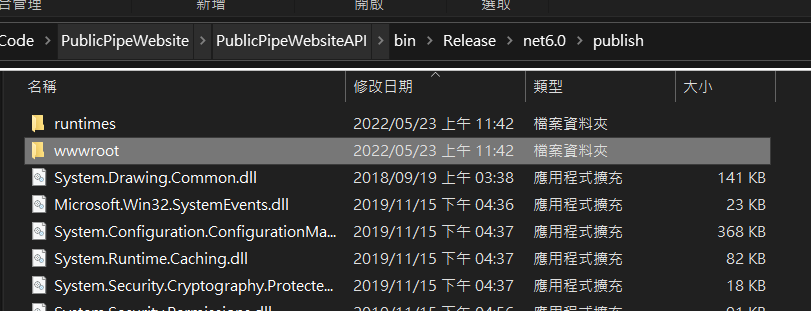
透過PublishRunWebpack,dotnet專案會在發佈後將前端專案所建置的檔案放置於publish資料夾下的wwwroot資料夾中,所以我們將publish資料夾中的所有檔案上傳至IIS網站資料夾中即可完成網站部屬。
排除sockjs-node錯誤訊息問題
Errors in browser console, requests to /sockjs-node/info?t=1555629946494
vue.config.js
module.exports = {
    devServer: {
        public: 'localhost' \\加入此行
    },
}
設定babel支援ES6語法轉換為ES2015
為了讓IE11能順利支援ES6的新語法,必須要透過以下babel套件來進行轉換
- @babel/core : babel 的核心程式碼
- @babel/cli : 終端機上使用 babel
- @babel/polyfill: 發布的環境下使用的套件
-
@babel/preset-env: 能讓你用最新的 JavaScript 語法寫程式,並且自動根據瀏覽器的環境引入需要的 polyfill。
https://shubo.io/babel-preset-env/
安裝套件
npm install --save-dev @babel/core @babel/cli @babel/preset-env
npm install --save @babel/polyfill
vue專案main.js檔案,import下面三個套件
import "@babel/polyfill";
import "core-js/stable";
import "regenerator-runtime/runtime";

import Vue from 'vue'
import App from './App.vue'
import router from './router'
import store from './store'

new Vue({
    router,
    store,
    render: h => h(App)
}).$mount('#app')
babel.config.js 設定preset
module.exports = {
    presets: [
    '@babel/env'
  ]
}